In-Camera Focus Stacking Using OM Systems
In the world of macro photography, capturing images with both incredible detail and depth has long been a challenge. Enter focus stacking – a game-changing technique that allows photographers to achieve unparalleled sharpness and depth of field. This article will explore how OM Systems cameras, specifically the OM-1 and OM-5, have revolutionized this process with their in-camera focus stacking capabilities.
What is Focus Stacking?
Focus stacking is a photographic technique where multiple images are captured at different focus points and then blended to create a final image with an extended depth of field. This method is particularly valuable in macro photography, where the depth of field is naturally shallow due to close focusing distances.
Traditionally, focus stacking required capturing multiple images manually and then blending them using specialized software. However, OM Systems has streamlined this process by integrating focus stacking directly into their cameras.
In-Camera Focus Stacking with OM Systems
OM Systems cameras like the OM-1 and OM-5 offer a built-in focus stacking feature that automates the entire process. Here’s how it works:
- Enable Focus Stacking: Navigate to the Computational Modes menu and activate “Focus Stacking.”

2. Set the Number of Shots: Choose the number of images for your desired depth. The OM-1 allows up to 15 shots, while the OM-5 is limited to 8.
3. Adjust Focus Differential: Set smaller steps for fine details or larger steps for broader subjects.
4. Set Charge Time: If using a flash, ensure there’s sufficient time between shots for the flash to recharge.
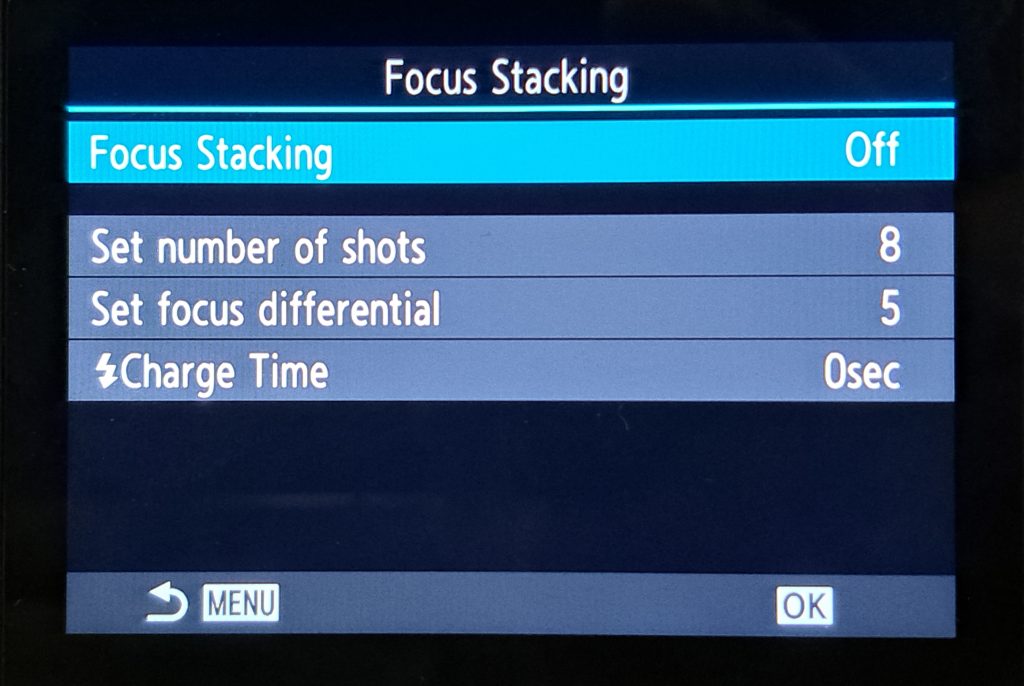
Once these parameters are set, the camera automatically captures the sequence of images and blends them into a single JPEG file.
Understanding the Shot Sequence
To visualize how in-camera focus stacking works, imagine a series of focal planes arranged from front to back:

- First Shot: Set focus to the closest point you want in the frame. For instance, in the case of an insect, this might be its antenna. The camera begins the focus stack from this focal plane. (indicated as “1” in the diagram).
- Second and Third Shot: For the second and third shot, the camera then shifts focus inwards towards you, capturing images at these focal planes.
- Subsequent Shots: The camera then gradually shifts focus further back, capturing multiple images at different focal planes. As shown in the diagram, it captures shots 4, 5 and so on, until it reaches the farthest part of the subject (plane 8).
- Final Composite Image: After capturing the shots, the camera merges them into a single image, creating a composite with extended depth of field.
Comparing OM-1 and OM-5 Focus Stacking Capabilities
| Feature | OM-1 | OM-5 |
|---|---|---|
| Maximum number of shots | 15 | 8 |
| Flash sync speed | 1/100s | 1/50s |
| Processor | TruePic X (Faster) | TruePic IX (Slower) |
Pros of In-Camera Focus Stacking
- Ease of Use: The entire process is automated within the camera.
- Instant Results: View the stacked image immediately on the camera’s screen.
- Customizable Settings: Adjust parameters to suit your subject and shooting conditions.
Cons of In-Camera Focus Stacking
- Processing Time: Assembling the stack can take several seconds to minutes.
- Battery Drain: The complex computations required can drain the battery faster.
- Limited Editing: In-camera processing offers fewer fine-tuning options compared to external software. The final output is in JPG format.
Tips for Better Results
- Use a Tripod: For maximum stability and consistent results, especially with subjects that don’t move.
- Handheld Technique: If shooting handheld, use a fast flash like the Godox 860VIII for quicker shooting (up to 10fps) with a 0.1s charge time.
- Custom Button Setup: Assign focus stacking to a custom button for quick access.
- Lighting: Employ diffused flash to minimize harsh shadows and enhance the final stack.
- Experiment: Practice with different subjects and adjust settings as needed.
- Manual Focus: For critical details, manual focus may offer better control than autofocus.
- Focus Bracketing: For more flexibility, use focus bracketing mode and stack images externally. This page provides an overview of the focus bracketing modes offered by OM Systems.
External Software Options
While in-camera stacking is convenient, some photographers prefer the control offered by external software. Programs like Zerene Stacker and Helicon Focus allow for:
- Working with RAW and TIFF files
- More precise control over the blending process
- Advanced retouching tools
Consider using external software for challenging subjects or when the highest quality output is required.
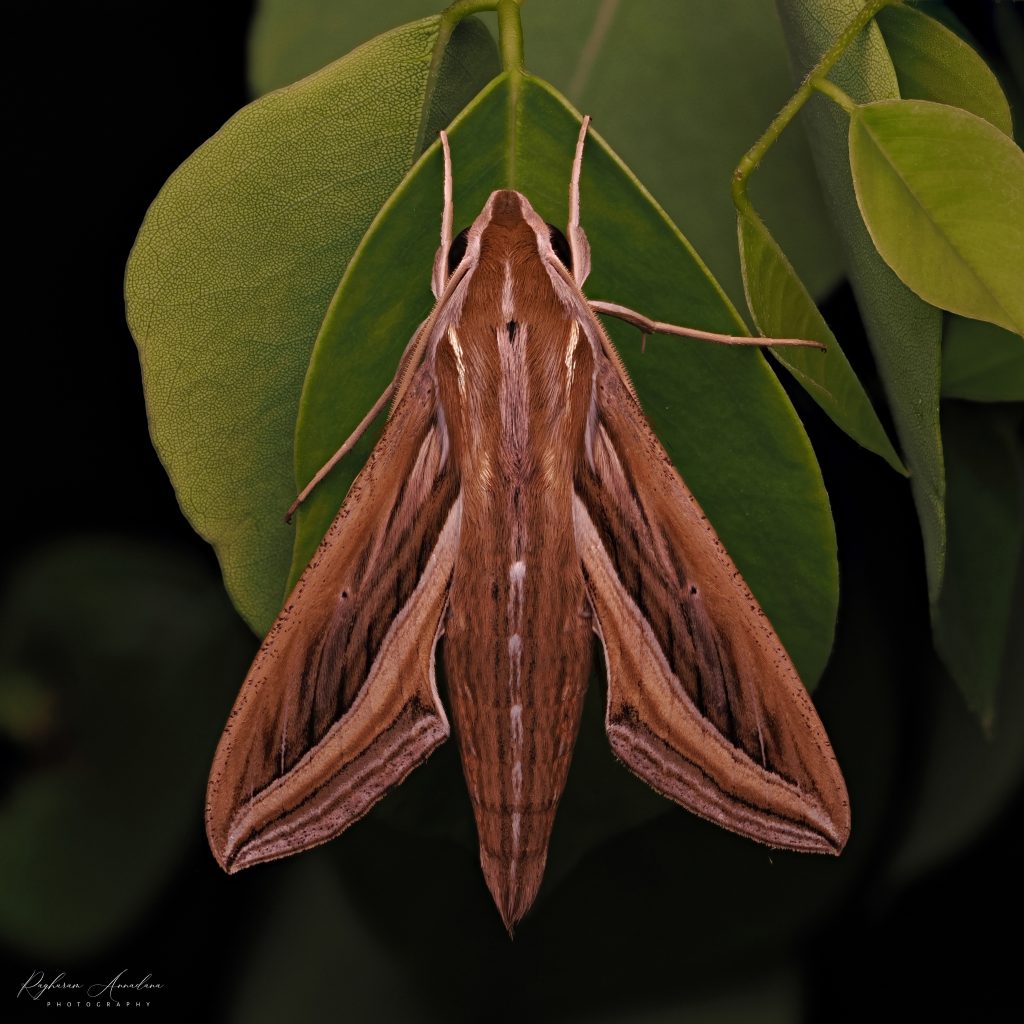
Real-World Example
As you can see in this example of the Hawk Moth’s wing, focus stacking reveals intricate details that would be impossible to capture in a single shot.

Conclusion
In-camera focus stacking with OM Systems cameras offers a powerful tool for macro photographers seeking to capture images with unprecedented depth and detail. While it has some limitations, the convenience and efficiency of this feature make it an invaluable asset for many photographers.
Whether you’re a seasoned pro or just starting your macro photography journey, mastering focus stacking can elevate your images to new levels of clarity and impact. Remember, great macro photography is about revealing the hidden worlds around us – and with focus stacking, those worlds have never been clearer.
Have you tried focus stacking with your OM Systems camera? Share your experiences and tips in the comments below!
Disclaimer: I am not affiliated with OM System/ Olympus, nor have I received any compensation for this review. All opinions shared are my own, based on my personal experience using the Olympus OM1


4 Comments
VINOD KUMAR V K
I request you to write a articles on Focus Stacking in post processing also.
Thank you
Raghuram Annadana
Thank you Vinod, sure will plan an article on the post processing aspects as well.
David Bennett
In relation to focus stacking with the OM-1, which I have, how can I be sure that the furthest frame that is taken from the camera actually covers the furthest focal plane of the subject? In terms of your diagram, I am talking about focal plane 8. Does the Differential setting have a part to play in this?
Thanks
Raghuram Annadana
Hi David,
The Differential setting controls how far apart each focus step is in the stack. If the value is too large for your chosen magnification, you’ll end up with gaps—areas that fall out of focus between frames. If it’s too small, you’ll get redundant images with very slight differences in focus. The goal is to find a setting that gives you full coverage without unnecessary overlap.
To ensure the stack covers the entire depth of your subject, the simplest approach is to enable image review after each shot (you can find this under Basic Settings → Image Quality). As the stack progresses, watch the focus shift across your subject. You can stop the stack once you see that the focal plane has moved past the farthest area you want in focus. Thanks.